

Hopefully some will find this helpful.
It is well known that the V2's are geared tall... I'm sure most of you that own or have owned this bike know that 50 mph in low gear is nothing remarkable for these machines. There are a few options available to help with tire turning ability or low end grunt. You have clutching options, and in 06 Arctic Cat introduced the 4.0 gears for the V2... but even then these machines are not up to par with their single cylinder counterparts (in low range, at least).
Within the last few years, there seems to be another option. When Kawasaki introduced their sport UTV the Teryx, they kept the same engine as the Brute Force 750, but nearly doubled the weight. How were they able to get power to the ground with the same engine and same clutch set up? Easy - they lowered the final gear ratio by introducing a different bevel gear set up. A lot of Brute Force drivers drop these Teryx Bevel gears in, and reap the benefits of a super low gear.
Now... the only issue is that the output shafts for 650V2 motor are different. The V2 Kawi motor uses what seems to be a love-joy locking system to keep the driven bevel in place, while the Teryx and Brute use a flange and nut. The bad news about this is that the Teryx gear will not drop directly onto the Arctic Cat output shaft. But, this is something that is easily doable, and requires only a bit of welding to make it work.
So, let's get down to it.
----------------------------------------------------------
Why a gear reduction?
- If you have large tires (29.5+), and want to reduce belt problems and issues, or if you just want a real low gear. This is a little more than a 14% reduction. For comparative terms, going to 3.6 to 4.0 gears is about a 11% reduction. A V2 with 4.0's and this reduction will be geared a little bit lower than a 650 H1 with 3.6's.
Parts list (all Kawasaki part numbers):
Kawasaki Teryx Bevel Gears:
49022-0044 GEAR-BEVEL,DRIVE
49022-0045 GEAR-BEVEL,DRIVEN
Shims:
92180-1307 SHIM,DRIVEN,T=0.151
92180-1308 SHIM,DRIVEN,T=0.201
92180-1309 SHIM,DRIVEN,T=0.501
92180-1310 SHIM,DRIVEN,T=0.801
92180-1311 SHIM,DRIVE,T=0.151
92180-1312 SHIM,DRIVE,T=0.201
92180-1313 SHIM,DRIVE,T=0.501
92180-1314 SHIM,DRIVE,T=0.801
92180-1349 SHIM,DRIVEN,T=1.001
92180-1350 SHIM,DRIVEN,T=1.201
92180-1351 SHIM,DRIVE,T=1.001
92180-1352 SHIM,DRIVE,T=1.201
Tools required:
Kawasaki #57001-1482 (a good shop will either loan this out or do the job for you when it's time)
Gear marking compound (tooth paste works just fine)
Dial indicator (you need to set back lash - this is important)
Total cost this will run you about $200-250 depending on where/how you get your parts. Not bad for a gear reduction.
----------------------------------------------------------
Now, let's get started.
First, it's going to help, but not be necessary for you to remove your plastics. Your tires/wheels can stay on (honestly this will help). Now, the big kicker - You won't have to remove your engine or split the cases to do this. That's right - the engine can stay in the frame, making this a MUCH easier job. Go ahead and drain the oil out of your engine, you'll lose it anyway since you're opening up the transmission.
Once you are to where you can get started, start by unbolting the engine. There are only 2 bolts, one in the bottom front, another at the top rear. You'll also want to unbolt the exhaust from the frame (two bolts). This will allow you to move the engine and get the drive-shafts off the output shaft. (NOTE: if you for some reason have the rear differential out, you can skip this step, or if you would prefer to just remove the rear differential you can - I think it's easier to move the engine, honestly). Next, unbolt both differentials to allow for slack/movement as well. This also makes it easier to put the driveshafts on/off.
Now, here is what the bevel gears look like as a cross section:
![Image]()
Parts 10 and 15 are what we are replacing with the Teryx gears and part #9 is the through shaft that your driveshafts attach to.
With your engine moving around a bit, go ahead and remove your rear driveshaft from the output shaft. This may require either a jack, engine lifts and/or an extra person. You'll want to slide the engine forward AND up (as the exhaust will hit the frame going directly forward). A pry bar may help a bit. Once the rear driveshaft is off, you can unbolt the 4 10mm headbolts that hold the output shaft in (parts # 1). It will slide right out, as there is nothing on the front holding it back.
Now, you should have this out of your engine (parts 1-14 in the diagram):
![Image]()
note that the front splines are different - this is from a Prairie, but should give you an idea.
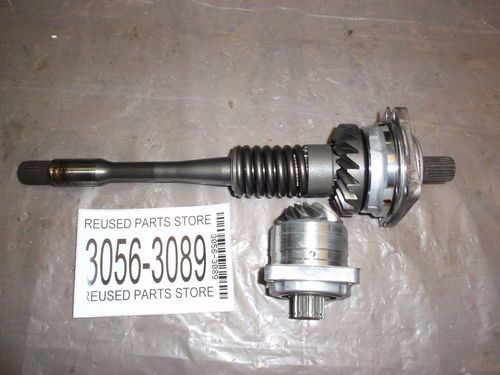
Now, we can remove the drive bevel gear. (part 15) This comes out by the dipstick. It will be helpful to remove the floorboard if you haven't done so already. There are 3 bolts that hold the dipstick cover on (8mm), and one that holds the transmission sensor (10mm). Remove the dipstick cover, and remove the circlip/snap ring that holds the starter gear on. Now you should see 4 10mm bolts (part #1 in the earlier diagram). Remove them, and the drive gear holder (part #19) with drive gear will come out with a little coercing and effort.
Now, you should have both gears out:
![Image]()
To remove the driven gear (part #10), you'll need to compress the spring and remove the snap ring that holds it in place. The gear and love-joy style holder will all come off the shaft. To remove the drive gear, you will need the Kawasaki special tool, or to take it to your local Kawasaki dealer. (it's cheaper usually to take it to the dealer - but don't forget to get them to put the Teryx gear in as well!)
So, here is where it gets a little tricky, and you'll have to do some custom work. The Teryx driven bevel gear will not work with the love-joy/spring set up. You will have to press the Teryx gear on (it's a TIGHT fit), and weld it to the shaft once you can shim (DO NOT WELD UNTIL YOU HAVE IT SHIMMED!).
Now, with your Teryx gears in place, all you have to do is set the back lash and tooth contact. Backlash needs to be within .002-.0043 (in), or .05-.11mm. I set mine a little on the tight side (about .0015), but that's because it is difficult to check lash 100% perpendicular, and I prefer to err on the side of caution, as any readings will be artificially lower because of this. Next, you'll have to set the tooth contact pattern. Apply your gear marking compound (or toothpaste - either works) to 4-5 teeth of the driven gear. Now spin the driven gear forward and reverse about 5 times each way (full rotations). Remove the drive gear, and check. Shim accordingly. You want the gears to be touching almost in the middle, if not a bit towards the toe/outside of the drive gear. If you find you don't have enough room to shim, then just move your driven gear up/down the output shaft as needed, then see what you can do. Theoretically, you won't NEED the shims for backlash as much, as you can move the driven gear up and down the shaft by nearly a full half inch. However, I think it's best to get close, and then shim.
Note : Changing driven housing shims will affect backlash more than contact pattern. Changing drive housing shims will affect contact pattern more than backlash. Always recheck backlash anytime you add shims.
With your backlash and tooth contact set, you can now weld the gear in place.
Tips for welding the gear (Big thanks to user Jim Timber):
1. DO NOT WELD until you are sure you can set backlash and tooth contact.
2. Go slow, take your time.
3. When you weld it, you should be careful not to get the gear hot or you'll risk losing that hardness and the teeth will wear quickly. (this may be a good reason to shim on the tight side - it'll be hard to circumvent ALL heat)
4. Weld three little tacks to locate the gear. Let it cool completely. Then come back and put a small bead on one side, let cool completely, do the opposite side, repeat - working your way around the seam. Don't let the gear get over a couple hundred degrees if you can help it.
5. Use TIG if you can, you'll get a better joint, even though it will heat soak more. MIG has problems with cold lap at the start of the weld. With this process using mig, you end up with a lot of non-welded bead over the weldment as a whole.
6. If you want to check balance, put it on a lathe and turn it down. This will require you put more weld on than you want to end up with, but will prevent vibrations and is a very good step to take. However, due to the tight fitment of the gear on the shaft, it's going to be about as balanced as possible. But it never hurts to be sure!
-------------------------------------------------------------
Now, put it all back together, and you should immediately notice better low end, and a high gear that is useful for something other than top speed racing.
I'm attaching the manual that details bevel gear removal and set up step by step, and may cover any other questions you may have.
The full manual can be found here: (section 3 details bevel gears)
http://dl.dropbox.com/u/22696677/User Service Manual For ARCTIC CAT 650 VT 4X4 FIS Auto - 2004.rar
Now, enjoy your V2!
It is well known that the V2's are geared tall... I'm sure most of you that own or have owned this bike know that 50 mph in low gear is nothing remarkable for these machines. There are a few options available to help with tire turning ability or low end grunt. You have clutching options, and in 06 Arctic Cat introduced the 4.0 gears for the V2... but even then these machines are not up to par with their single cylinder counterparts (in low range, at least).
Within the last few years, there seems to be another option. When Kawasaki introduced their sport UTV the Teryx, they kept the same engine as the Brute Force 750, but nearly doubled the weight. How were they able to get power to the ground with the same engine and same clutch set up? Easy - they lowered the final gear ratio by introducing a different bevel gear set up. A lot of Brute Force drivers drop these Teryx Bevel gears in, and reap the benefits of a super low gear.
Now... the only issue is that the output shafts for 650V2 motor are different. The V2 Kawi motor uses what seems to be a love-joy locking system to keep the driven bevel in place, while the Teryx and Brute use a flange and nut. The bad news about this is that the Teryx gear will not drop directly onto the Arctic Cat output shaft. But, this is something that is easily doable, and requires only a bit of welding to make it work.
So, let's get down to it.
----------------------------------------------------------
Why a gear reduction?
- If you have large tires (29.5+), and want to reduce belt problems and issues, or if you just want a real low gear. This is a little more than a 14% reduction. For comparative terms, going to 3.6 to 4.0 gears is about a 11% reduction. A V2 with 4.0's and this reduction will be geared a little bit lower than a 650 H1 with 3.6's.
Parts list (all Kawasaki part numbers):
Kawasaki Teryx Bevel Gears:
49022-0044 GEAR-BEVEL,DRIVE
49022-0045 GEAR-BEVEL,DRIVEN
Shims:
92180-1307 SHIM,DRIVEN,T=0.151
92180-1308 SHIM,DRIVEN,T=0.201
92180-1309 SHIM,DRIVEN,T=0.501
92180-1310 SHIM,DRIVEN,T=0.801
92180-1311 SHIM,DRIVE,T=0.151
92180-1312 SHIM,DRIVE,T=0.201
92180-1313 SHIM,DRIVE,T=0.501
92180-1314 SHIM,DRIVE,T=0.801
92180-1349 SHIM,DRIVEN,T=1.001
92180-1350 SHIM,DRIVEN,T=1.201
92180-1351 SHIM,DRIVE,T=1.001
92180-1352 SHIM,DRIVE,T=1.201
Tools required:
Kawasaki #57001-1482 (a good shop will either loan this out or do the job for you when it's time)
Gear marking compound (tooth paste works just fine)
Dial indicator (you need to set back lash - this is important)
Total cost this will run you about $200-250 depending on where/how you get your parts. Not bad for a gear reduction.
----------------------------------------------------------
Now, let's get started.
First, it's going to help, but not be necessary for you to remove your plastics. Your tires/wheels can stay on (honestly this will help). Now, the big kicker - You won't have to remove your engine or split the cases to do this. That's right - the engine can stay in the frame, making this a MUCH easier job. Go ahead and drain the oil out of your engine, you'll lose it anyway since you're opening up the transmission.
Once you are to where you can get started, start by unbolting the engine. There are only 2 bolts, one in the bottom front, another at the top rear. You'll also want to unbolt the exhaust from the frame (two bolts). This will allow you to move the engine and get the drive-shafts off the output shaft. (NOTE: if you for some reason have the rear differential out, you can skip this step, or if you would prefer to just remove the rear differential you can - I think it's easier to move the engine, honestly). Next, unbolt both differentials to allow for slack/movement as well. This also makes it easier to put the driveshafts on/off.
Now, here is what the bevel gears look like as a cross section:
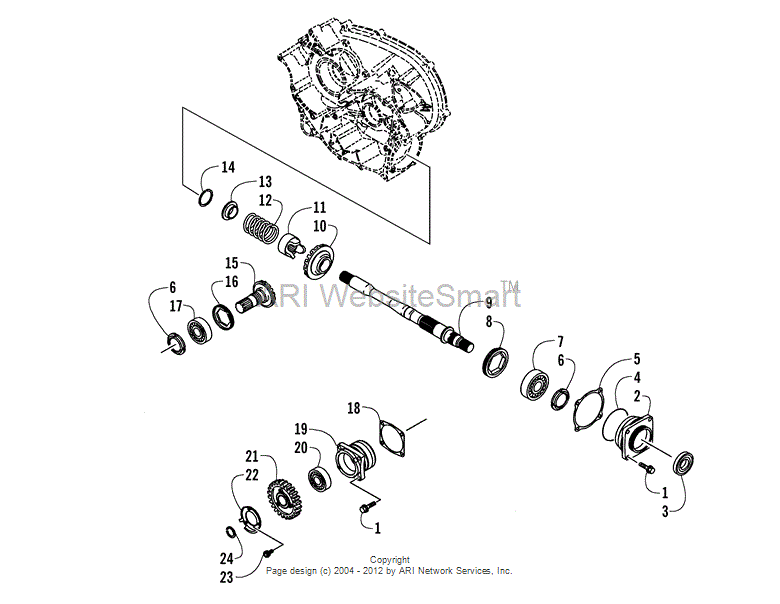
Parts 10 and 15 are what we are replacing with the Teryx gears and part #9 is the through shaft that your driveshafts attach to.
With your engine moving around a bit, go ahead and remove your rear driveshaft from the output shaft. This may require either a jack, engine lifts and/or an extra person. You'll want to slide the engine forward AND up (as the exhaust will hit the frame going directly forward). A pry bar may help a bit. Once the rear driveshaft is off, you can unbolt the 4 10mm headbolts that hold the output shaft in (parts # 1). It will slide right out, as there is nothing on the front holding it back.
Now, you should have this out of your engine (parts 1-14 in the diagram):
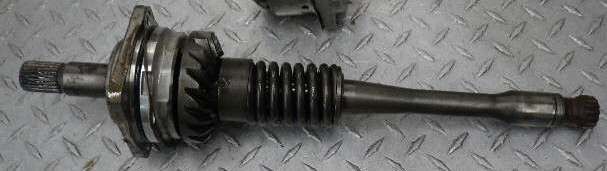
note that the front splines are different - this is from a Prairie, but should give you an idea.
Now, we can remove the drive bevel gear. (part 15) This comes out by the dipstick. It will be helpful to remove the floorboard if you haven't done so already. There are 3 bolts that hold the dipstick cover on (8mm), and one that holds the transmission sensor (10mm). Remove the dipstick cover, and remove the circlip/snap ring that holds the starter gear on. Now you should see 4 10mm bolts (part #1 in the earlier diagram). Remove them, and the drive gear holder (part #19) with drive gear will come out with a little coercing and effort.
Now, you should have both gears out:
To remove the driven gear (part #10), you'll need to compress the spring and remove the snap ring that holds it in place. The gear and love-joy style holder will all come off the shaft. To remove the drive gear, you will need the Kawasaki special tool, or to take it to your local Kawasaki dealer. (it's cheaper usually to take it to the dealer - but don't forget to get them to put the Teryx gear in as well!)
So, here is where it gets a little tricky, and you'll have to do some custom work. The Teryx driven bevel gear will not work with the love-joy/spring set up. You will have to press the Teryx gear on (it's a TIGHT fit), and weld it to the shaft once you can shim (DO NOT WELD UNTIL YOU HAVE IT SHIMMED!).
Now, with your Teryx gears in place, all you have to do is set the back lash and tooth contact. Backlash needs to be within .002-.0043 (in), or .05-.11mm. I set mine a little on the tight side (about .0015), but that's because it is difficult to check lash 100% perpendicular, and I prefer to err on the side of caution, as any readings will be artificially lower because of this. Next, you'll have to set the tooth contact pattern. Apply your gear marking compound (or toothpaste - either works) to 4-5 teeth of the driven gear. Now spin the driven gear forward and reverse about 5 times each way (full rotations). Remove the drive gear, and check. Shim accordingly. You want the gears to be touching almost in the middle, if not a bit towards the toe/outside of the drive gear. If you find you don't have enough room to shim, then just move your driven gear up/down the output shaft as needed, then see what you can do. Theoretically, you won't NEED the shims for backlash as much, as you can move the driven gear up and down the shaft by nearly a full half inch. However, I think it's best to get close, and then shim.
Note : Changing driven housing shims will affect backlash more than contact pattern. Changing drive housing shims will affect contact pattern more than backlash. Always recheck backlash anytime you add shims.
With your backlash and tooth contact set, you can now weld the gear in place.
Tips for welding the gear (Big thanks to user Jim Timber):
1. DO NOT WELD until you are sure you can set backlash and tooth contact.
2. Go slow, take your time.
3. When you weld it, you should be careful not to get the gear hot or you'll risk losing that hardness and the teeth will wear quickly. (this may be a good reason to shim on the tight side - it'll be hard to circumvent ALL heat)
4. Weld three little tacks to locate the gear. Let it cool completely. Then come back and put a small bead on one side, let cool completely, do the opposite side, repeat - working your way around the seam. Don't let the gear get over a couple hundred degrees if you can help it.
5. Use TIG if you can, you'll get a better joint, even though it will heat soak more. MIG has problems with cold lap at the start of the weld. With this process using mig, you end up with a lot of non-welded bead over the weldment as a whole.
6. If you want to check balance, put it on a lathe and turn it down. This will require you put more weld on than you want to end up with, but will prevent vibrations and is a very good step to take. However, due to the tight fitment of the gear on the shaft, it's going to be about as balanced as possible. But it never hurts to be sure!
-------------------------------------------------------------
Now, put it all back together, and you should immediately notice better low end, and a high gear that is useful for something other than top speed racing.
I'm attaching the manual that details bevel gear removal and set up step by step, and may cover any other questions you may have.
The full manual can be found here: (section 3 details bevel gears)
http://dl.dropbox.com/u/22696677/User Service Manual For ARCTIC CAT 650 VT 4X4 FIS Auto - 2004.rar
Now, enjoy your V2!


